Sorry there have been no updates. My oldest son had surgery, and we are spending some family time during his recovery.
Friday, December 28, 2012
Thursday, December 20, 2012
Pins 62-67 Getting Streak Free Windows, Really Cleaning that Kitchen Sink & Getting your Glass Stovetop Clean
I'm sure I'm not the only one in what I like to call the "Holiday" Crunch. Trying to get all the shopping, wrapping, baking and endless other things done can really make it seem like there are not enough hours in the day. We have company coming for the holidays (starting this weekend) so I really needed to get my butt in gear and start cleaning, especially after my baking marathon yesterday. The kitchen was in desperate need of some serious attention.......Some days I don't mind cleaning and some days I will do whatever I can to avoid it. Let's face it cleaning a kitchen is up there with doing Laundry and Dishes.....as soon as you finish you turn around and it's(their) dirty again (Especially with 6 kids). I was on the hunt for any tips or tricks that would either speed up my cleaning process, make it easier or give me better results then my "tried and true" ways.
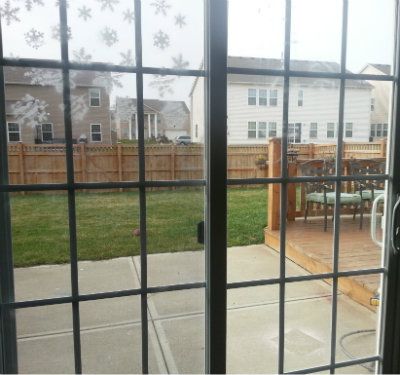
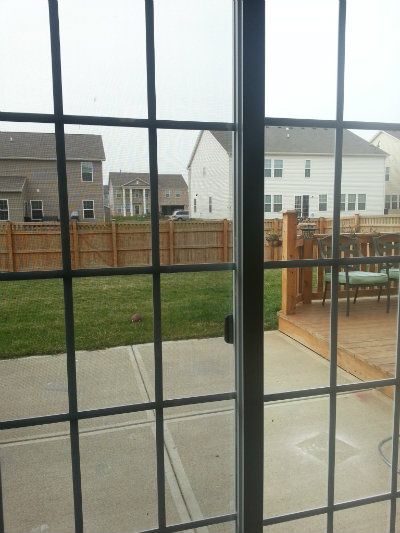
Normally I finish with my sliding doors when I clean the kitchen, but we started (alright, I admit it, I started, but didn't finish) snowy snowflakes on the doors. The kids have put their fingers through them along with adding numerous fingerprints, nose prints, forehead prints. The door looked a mess and I just couldn't take it anymore.

I figured I would give this method a try. Seemed Simple enough, and I had everything I needed on hand.
Items Needed:
Bucket, Bowl, or even Sink full of warm water
A few drops of Dawn
Sponge or Scrubby
Squeegee
Microfiber towel to wipe off squeegee
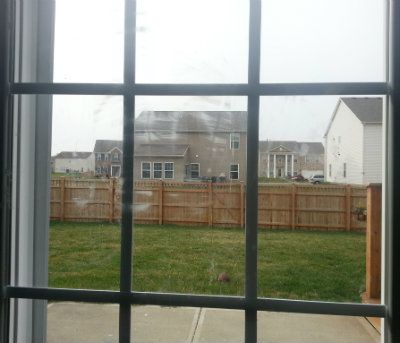
It is near impossible for me to a get a good picture of a dirty window.....the fingerprints and such just don't wanna show up! But trust me unfortunately they are there.
Just fill up you bowl with warm water, add just a few drops of Dawn (So many uses for this stuff!) take your sponge or scrub and wash your windows. If you are worried about dripping water, ring out your sponge and wash your window in sections, or lay a towel at the bottom to catch any water that may drip. Now take your squeegee and wipe away. For this to really work you need to wipe off your squeegee after each wipe. For some reason my squeegee was bent, so it was a little awkward to use, and I had to redo a few areas, when I say redo all I actually mean is running the squeegee back over the dry window to get a streak free clean.
I am happy with the results. I will definitely use this method again. I don't think it will be my everyday go to method, but once a week I think will work. My plan is to just use my sink water next time before I start my dishes and the water gets icky. If the girls had been home I think they would have liked to have squeegeed for me. To be honest I'm not sure if I got the streak free shine from the soapy water or the squeegee, but either way, I'll take it.
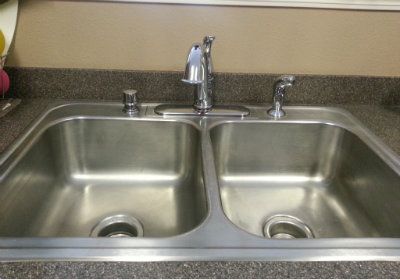
I don't know about you guys, but in my home it is IMPOSSIBLE to keep my sink clean. The kids are always throwing stuff in the sink. Bowls and cups are always in there. And since many times they literally toss them into the sink I end up with splash marks. They drive me crazy! We also have really hard water, and even with our water softener we end up with hard water stains. I use CLR to try and battle them, but it doesn't always work well. Who wants to scrub a sink and have it still look dirty!?!

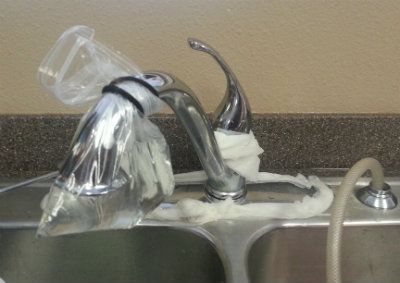
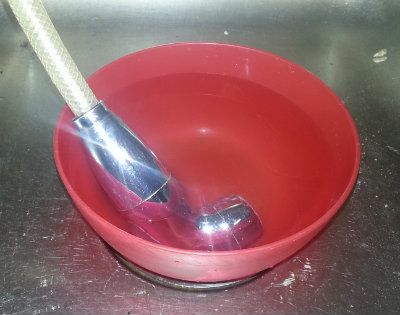
First I decided to start by letting my fixtures soak in white vinegar. I keep hearing that this will help with the hard water stains, and I had it sitting in my pantry since I have been using it a lot in my cleaning. I soaked paper towels to wrap around the base of the faucet, and pulled my hose out and sat it in a bowl. For the end of the faucet I filled a Ziploc bag, and used a rubber band to attach it so it could sit also. Now to be honest I don't know how long I let it sit because I was cleaning other things and lost track of time.
After it sat for a while I came back to the sink and pulled the hose out of the bowl and took a toothbrush and gently rubbed it over the tip any build up that had been there was now gone. I left the vinegar in the bowl and sat it on the counter to use a little later. Now that my sink was clear I sprinkled baking soda all over it (just like you would if you were using Comet or Barkeeper's Friend)

Next empty Parmesan container we have I will be filling like they did in the pin and adding some lavender or orange essential oil so it will smell pretty.
Just wet your sponge and scrub like you would any other cleaner, I had to rinse twice, but don't consider that a big deal. If you have sensitive hands wear some gloves. Baking soda can actually be rather abrasive to your hands. Now while your in the middle of rinsing you can also clean your drain.

Super Simple, sprinkle extra baking soda in your drain, then take your vinegar and pour some over it down the drain. I just used the bowl of vinegar that I had had my sprayer sitting in. This is fun to do with kids because they usually like to watch and hear the foamy sizzling reaction of the two together. Let it sit for a few minutes then rinse with some hot water. This will help with that nasty gunk that can build up, but not so great at hair (in case you try it in a bathroom). I figured that since I was doing the drain I should also clean the disposal. Another really simple step.

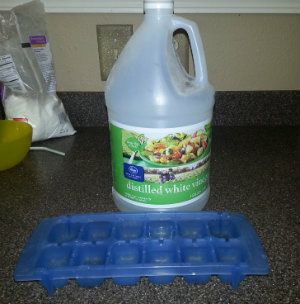
I had wanted to try this beforehand so I had already frozen some vinegar ice cubes
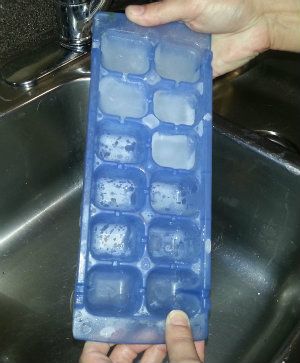
All you have to do is take them and dump them down the disposal and turn it on. I also add a few lemon and orange slices so it smelled good too! I used the whole tray.
Next I took the Ziploc bag off the faucet and removed the paper towels that were wrapped around the bottom of the fixtures and quickly scrubbed the areas. It didn't take much elbow grease at all. I rinsed everything thoroughly, then wiped it down.
The vinegar really did take care of the hard water stains and mineral deposits. I was pleasantly surprised. My only issue is that my nose has been trained over the years to recognize a bleach smell as meaning clean, so I'm still trying to get used to the smell of vinegar. When the kids came home they wanted to know who left the jar of pickles out and open......The smell did fade after about an hour. I will repeat all of this.....not ever day or even every week, but ever 2-4 weeks.
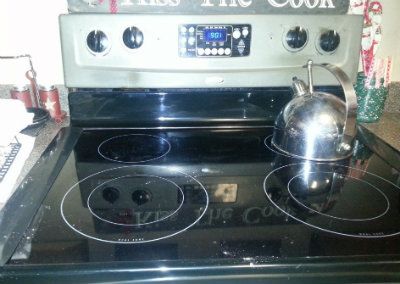
Glass stove tops can be a blessing and a curse. When I first got one I thought that it would be easier to clean since nothing could get under burners, but I soon learned that these stove tops have their own challenges. Even more so when you move into a house that has a stove top that has been stained and scratched by the previous owners. I usually just use a cleaner that is made specifically for glass tops. With a lot of elbow grease over the last few years I have gotten some of the stains up. My Mother in Law had told me that I could use baking soda on the stove top, but I never really tried it. I saw this pin and figured I already had my baking soda out for my sink why not try it on the stove.

My stove was a mess from all the baking I had been doing, so it really needed a "good" cleaning.
I sprinkled the baking soda on the stove top
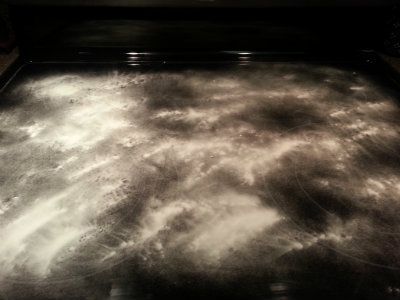
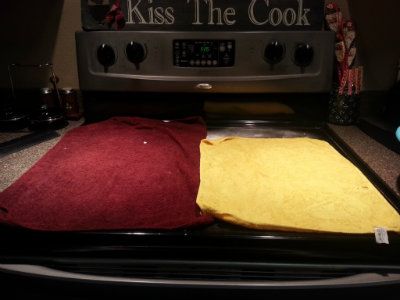
Then filled my bowl with hot soapy water, and put my rags in it, took them out, squeezed most of the water off of them, then laid them on top of the baking soda. You want the rags to be wet, but not soaking wet. Let it sit for 15-20 min.
Lift your rags off, and inspect. I had a few spots that still needed a little scrubbing, but most areas were clean already. Scrub if necessary, then wipe off. This took me a few times. Some of the baking soda really seemed to be in love with my stove top because it didn't see to want to come off. A wet sponge worked best for me. The baking soda just kind of stuck to it. Once I had all the baking soda off I took a microfiber towel and shined it up a bit.
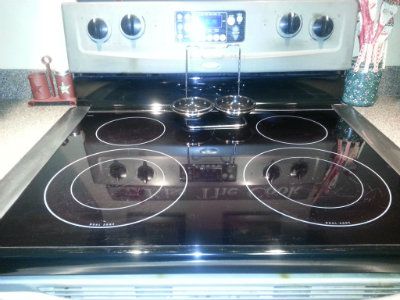
Worst part of a nice clean top for me is that it shows all the scratches.
Love the look of a nice clean kitchen......

Pin 62 Easy Streak Free Windows
Normally I finish with my sliding doors when I clean the kitchen, but we started (alright, I admit it, I started, but didn't finish) snowy snowflakes on the doors. The kids have put their fingers through them along with adding numerous fingerprints, nose prints, forehead prints. The door looked a mess and I just couldn't take it anymore.
I figured I would give this method a try. Seemed Simple enough, and I had everything I needed on hand.
Items Needed:
Bucket, Bowl, or even Sink full of warm water
A few drops of Dawn
Sponge or Scrubby
Squeegee
Microfiber towel to wipe off squeegee

It is near impossible for me to a get a good picture of a dirty window.....the fingerprints and such just don't wanna show up! But trust me unfortunately they are there.

Just fill up you bowl with warm water, add just a few drops of Dawn (So many uses for this stuff!) take your sponge or scrub and wash your windows. If you are worried about dripping water, ring out your sponge and wash your window in sections, or lay a towel at the bottom to catch any water that may drip. Now take your squeegee and wipe away. For this to really work you need to wipe off your squeegee after each wipe. For some reason my squeegee was bent, so it was a little awkward to use, and I had to redo a few areas, when I say redo all I actually mean is running the squeegee back over the dry window to get a streak free clean.
I am happy with the results. I will definitely use this method again. I don't think it will be my everyday go to method, but once a week I think will work. My plan is to just use my sink water next time before I start my dishes and the water gets icky. If the girls had been home I think they would have liked to have squeegeed for me. To be honest I'm not sure if I got the streak free shine from the soapy water or the squeegee, but either way, I'll take it.

Pin 63,64, 65 & 66 Really Cleaning Your Kitchen Sink using Vinegar and Baking Soda (including your drain and disposal)
I don't know about you guys, but in my home it is IMPOSSIBLE to keep my sink clean. The kids are always throwing stuff in the sink. Bowls and cups are always in there. And since many times they literally toss them into the sink I end up with splash marks. They drive me crazy! We also have really hard water, and even with our water softener we end up with hard water stains. I use CLR to try and battle them, but it doesn't always work well. Who wants to scrub a sink and have it still look dirty!?!
First I decided to start by letting my fixtures soak in white vinegar. I keep hearing that this will help with the hard water stains, and I had it sitting in my pantry since I have been using it a lot in my cleaning. I soaked paper towels to wrap around the base of the faucet, and pulled my hose out and sat it in a bowl. For the end of the faucet I filled a Ziploc bag, and used a rubber band to attach it so it could sit also. Now to be honest I don't know how long I let it sit because I was cleaning other things and lost track of time.


After it sat for a while I came back to the sink and pulled the hose out of the bowl and took a toothbrush and gently rubbed it over the tip any build up that had been there was now gone. I left the vinegar in the bowl and sat it on the counter to use a little later. Now that my sink was clear I sprinkled baking soda all over it (just like you would if you were using Comet or Barkeeper's Friend)
Next empty Parmesan container we have I will be filling like they did in the pin and adding some lavender or orange essential oil so it will smell pretty.
Just wet your sponge and scrub like you would any other cleaner, I had to rinse twice, but don't consider that a big deal. If you have sensitive hands wear some gloves. Baking soda can actually be rather abrasive to your hands. Now while your in the middle of rinsing you can also clean your drain.
Super Simple, sprinkle extra baking soda in your drain, then take your vinegar and pour some over it down the drain. I just used the bowl of vinegar that I had had my sprayer sitting in. This is fun to do with kids because they usually like to watch and hear the foamy sizzling reaction of the two together. Let it sit for a few minutes then rinse with some hot water. This will help with that nasty gunk that can build up, but not so great at hair (in case you try it in a bathroom). I figured that since I was doing the drain I should also clean the disposal. Another really simple step.
I had wanted to try this beforehand so I had already frozen some vinegar ice cubes

All you have to do is take them and dump them down the disposal and turn it on. I also add a few lemon and orange slices so it smelled good too! I used the whole tray.

Next I took the Ziploc bag off the faucet and removed the paper towels that were wrapped around the bottom of the fixtures and quickly scrubbed the areas. It didn't take much elbow grease at all. I rinsed everything thoroughly, then wiped it down.

The vinegar really did take care of the hard water stains and mineral deposits. I was pleasantly surprised. My only issue is that my nose has been trained over the years to recognize a bleach smell as meaning clean, so I'm still trying to get used to the smell of vinegar. When the kids came home they wanted to know who left the jar of pickles out and open......The smell did fade after about an hour. I will repeat all of this.....not ever day or even every week, but ever 2-4 weeks.
Pin 67 Cleaning your Glass Cooktop with Baking Soda
Glass stove tops can be a blessing and a curse. When I first got one I thought that it would be easier to clean since nothing could get under burners, but I soon learned that these stove tops have their own challenges. Even more so when you move into a house that has a stove top that has been stained and scratched by the previous owners. I usually just use a cleaner that is made specifically for glass tops. With a lot of elbow grease over the last few years I have gotten some of the stains up. My Mother in Law had told me that I could use baking soda on the stove top, but I never really tried it. I saw this pin and figured I already had my baking soda out for my sink why not try it on the stove.
My stove was a mess from all the baking I had been doing, so it really needed a "good" cleaning.

I sprinkled the baking soda on the stove top

Then filled my bowl with hot soapy water, and put my rags in it, took them out, squeezed most of the water off of them, then laid them on top of the baking soda. You want the rags to be wet, but not soaking wet. Let it sit for 15-20 min.

Lift your rags off, and inspect. I had a few spots that still needed a little scrubbing, but most areas were clean already. Scrub if necessary, then wipe off. This took me a few times. Some of the baking soda really seemed to be in love with my stove top because it didn't see to want to come off. A wet sponge worked best for me. The baking soda just kind of stuck to it. Once I had all the baking soda off I took a microfiber towel and shined it up a bit.

Worst part of a nice clean top for me is that it shows all the scratches.
Love the look of a nice clean kitchen......
Wednesday, December 19, 2012
Pin 59, 60 & 61 Cheesecake Cookies, Lemon Crinkles with Glaze, Chocolate Crinkles with Candy Cane Hershey Kisses and a, Bonus M&M Cookies
Holiday baking is all that was on my agenda today.....and let me tell you I do think that I am baked out. It's all fun in the beginning, but after so many batches of cookies the fun is gone! Probably because the clean-up is what's left! Almost all our baking for Teacher Baskets is complete. One more batch of cookies to be pulled out of the fridge and baked, then that's it! (at least for the next couple of days)

What you need for this recipe:
3/4 cup unsalted butter, softened
3 ounces cream cheese
2/3 cup sugar
1 tsp vanilla extract
2 cups All-Purpose Flour
Graham Cracker Crumbs, for coating
Preheat oven to 375 degrees.
In a large bowl, beat together butter, cream cheese, and sugar, then add in the vanilla. Once they are all mixed add in the flour until well combined.
Take scoops of dough and form 1" balls. Then roll in the graham cracker crumbs. Place the balls on a cookie sheet and bake for 12-15 minutes.
and with some cinnamon glaze
At least they aren't a bad looking cookie........If anyone has made these with success I would love to hear what you did to keep them moist!
I keep seeing these posted all over Pinterest, boasting that they are amazing, award winning cookies. Who doesn't want to try a recipe that seems like a winner even before you make them!

What you need for this recipe:
½ cups butter, softened
1 cup granulated sugar
½ teaspoons vanilla extract
1 whole egg
1 teaspoon lemon zest
1 Tablespoon fresh lemon juice
¼ teaspoons salt
¼ teaspoons baking powder
⅛ teaspoons baking soda
1-½ cup all-purpose flour
½ cups powdered sugar *** For Rolling the Cookies in ***
If you want that really nice tangy lemon taste make sure you use fresh lemons, not extract or ReaLemon.
In a mixing bowl cream butter and sugar together until light and fluffy, then add in the vanilla, egg, lemon zest, and juice. Stir in the dry ingredients until just combined. DO NOT ADD THE POWDERED SUGAR. Put your powdered sugar in a bowl. Take a teaspoon full of dough, it will be slightly sticky, roll it in the powdered sugar and place on the cookie sheet, continue till your cookie sheet is full. I found that it helped if I dipped my fingers into the powdered sugar then took the dough and rolled it in the sugar. It kept the dough from sticking to my fingers. Bake for about 9-11 min.
These were pretty good. Not the best Lemon Cookie ever, but good none the less. They weren't zesty enough for us so we added a Lemon Glaze. Just squeeze a few Tablespoons of fresh lemon juice and mix in powdered sugar till you get a consistency you like. Then just drizzle over the cookies. This gave them a really nice lemony kick.

What you need for this recipe:
2 cups all-purpose flour
1 cup unsweetened cocoa powder
2 teaspoons baking powder
1/2 teaspoon salt
2 cups granulated sugar
1/2 cup vegetable oil
4 large eggs
1 teaspoon vanilla extract
1 cup powdered sugar *** This is for rolling the cookies in ***
Assorted Hershey Kisses
These need to be put in the Fridge for a few hours after they are mixed up.
Bake at 350 degrees (Always preheat an oven when baking, unless otherwise stated)
Mix together sugar, oil, eggs, and vanilla. DO NOT ADD THE POWDERED SUGAR. Stir flour, cocoa, baking powder and salt, stir just until combined. You don't want to over do it. Then cover and put in the fridge for a few hours.
Roll into balls, we did about little over a teaspoon. Truthfully I just went with whatever looked good to me. Roll the ball in the powdered sugar then place on your cookie sheet, continue to your sheet is full. Bake for about 11 min. You should see your cookie start to crack, once they are cracking and the cracks look cake like you can take them out. Place your Hershey Kisses of choice on top as soon as they come out of the oven. Let cool on the cookie sheet for a few minutes before transferring them to cooling racks.
My air bake cookies sheets are non stick, if you are using regular cookie sheets, or something that is non stick, I recommend using some parchment paper while baking these.
These were almost like eating Brownies. The melting kisses just add to the yumminess of this cookie.
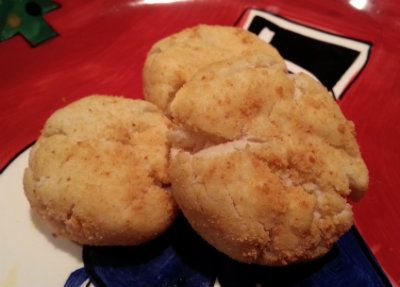
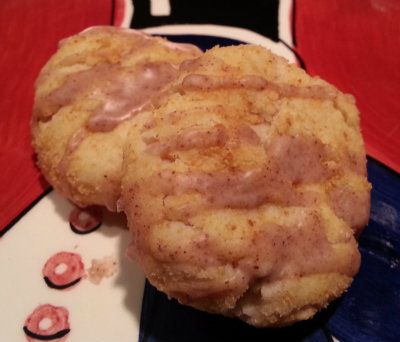
Pin 59 Cheesecake Cookies
I had really high hopes for this recipe. I could live on cheesecake. I thought how perfect would a bite size form of cheesecake be.........well I strongly suggest you stick with actual cheesecake. These were extremely dry. I even tried under baking a batch to see if that would make a difference and it didn't. We added a cinnamon glaze to some ( I had made it for some muffins) and it helped a little bit, but this is a recipe I won't be trying again.What you need for this recipe:
3/4 cup unsalted butter, softened
3 ounces cream cheese
2/3 cup sugar
1 tsp vanilla extract
2 cups All-Purpose Flour
Graham Cracker Crumbs, for coating
Preheat oven to 375 degrees.
In a large bowl, beat together butter, cream cheese, and sugar, then add in the vanilla. Once they are all mixed add in the flour until well combined.
Take scoops of dough and form 1" balls. Then roll in the graham cracker crumbs. Place the balls on a cookie sheet and bake for 12-15 minutes.

and with some cinnamon glaze

At least they aren't a bad looking cookie........If anyone has made these with success I would love to hear what you did to keep them moist!
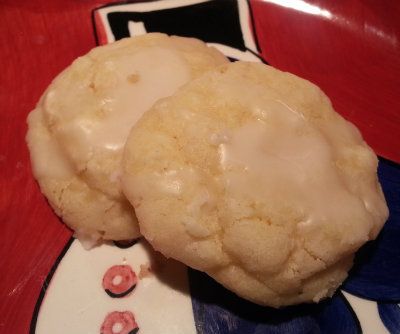
Pin 60 Lemon Crinkle Cookies
I keep seeing these posted all over Pinterest, boasting that they are amazing, award winning cookies. Who doesn't want to try a recipe that seems like a winner even before you make them!
What you need for this recipe:
½ cups butter, softened
1 cup granulated sugar
½ teaspoons vanilla extract
1 whole egg
1 teaspoon lemon zest
1 Tablespoon fresh lemon juice
¼ teaspoons salt
¼ teaspoons baking powder
⅛ teaspoons baking soda
1-½ cup all-purpose flour
½ cups powdered sugar *** For Rolling the Cookies in ***
If you want that really nice tangy lemon taste make sure you use fresh lemons, not extract or ReaLemon.
In a mixing bowl cream butter and sugar together until light and fluffy, then add in the vanilla, egg, lemon zest, and juice. Stir in the dry ingredients until just combined. DO NOT ADD THE POWDERED SUGAR. Put your powdered sugar in a bowl. Take a teaspoon full of dough, it will be slightly sticky, roll it in the powdered sugar and place on the cookie sheet, continue till your cookie sheet is full. I found that it helped if I dipped my fingers into the powdered sugar then took the dough and rolled it in the sugar. It kept the dough from sticking to my fingers. Bake for about 9-11 min.
These were pretty good. Not the best Lemon Cookie ever, but good none the less. They weren't zesty enough for us so we added a Lemon Glaze. Just squeeze a few Tablespoons of fresh lemon juice and mix in powdered sugar till you get a consistency you like. Then just drizzle over the cookies. This gave them a really nice lemony kick.

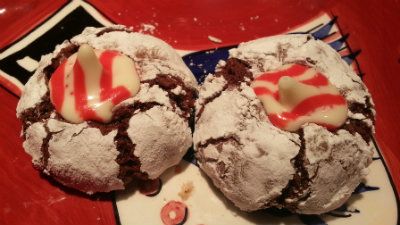
Pin 61 Chocolate Crinkles with Candy Cane Hershey Kisses
These babies were the star of the show! This recipe made well over 50 cookies, smelled great while baking, and even better when cooling with a candy cane kiss on top. If you love chocolate and peppermint like I do this is a must try.........if you don't you can still try the recipe and add whatever kind of Hershey Kiss your heart desires!What you need for this recipe:
2 cups all-purpose flour
1 cup unsweetened cocoa powder
2 teaspoons baking powder
1/2 teaspoon salt
2 cups granulated sugar
1/2 cup vegetable oil
4 large eggs
1 teaspoon vanilla extract
1 cup powdered sugar *** This is for rolling the cookies in ***
Assorted Hershey Kisses
These need to be put in the Fridge for a few hours after they are mixed up.
Bake at 350 degrees (Always preheat an oven when baking, unless otherwise stated)
Mix together sugar, oil, eggs, and vanilla. DO NOT ADD THE POWDERED SUGAR. Stir flour, cocoa, baking powder and salt, stir just until combined. You don't want to over do it. Then cover and put in the fridge for a few hours.
Roll into balls, we did about little over a teaspoon. Truthfully I just went with whatever looked good to me. Roll the ball in the powdered sugar then place on your cookie sheet, continue to your sheet is full. Bake for about 11 min. You should see your cookie start to crack, once they are cracking and the cracks look cake like you can take them out. Place your Hershey Kisses of choice on top as soon as they come out of the oven. Let cool on the cookie sheet for a few minutes before transferring them to cooling racks.
My air bake cookies sheets are non stick, if you are using regular cookie sheets, or something that is non stick, I recommend using some parchment paper while baking these.

These were almost like eating Brownies. The melting kisses just add to the yumminess of this cookie.
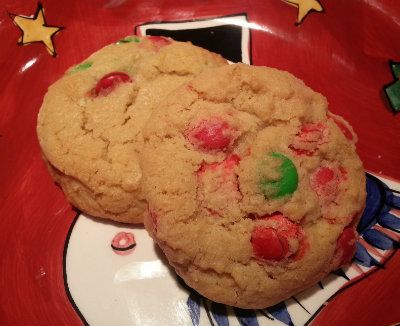
Pin 35 Re-Visited M&M's instead of Chocolate Chip Cookies
We also made some cookies using the recipe from the chocolate chip cookies featured in pin 35. You can get the cookie dough recipe here. Only thing we did different was add in some red and green M&M's. It's a nice change and the cookies are a hit with kids and adults alike.
Tuesday, December 18, 2012
Pin 57 & 58 Brown Butter Chocolate Chip Cookies and Mexican Wedding Cookies
We are spending our week doing a lot of baking. Tons of tins waiting to be filled up and given as gifts. Usually I like to "test" a recipe first, not try it for the first time when I'm giving it away, but I just couldn't help myself. Sometimes you just get tired of making the same 'ole things.....
Ok, seriously who knew that browning butter could make a cookie taste so different. Browning the butter takes the chocolate chip cookie to the "gourmet" level. After making these I wrote the recipe down in my recipe book labeled "The Grown-Up Chocolate Chip Cookie".

Now if you have never browned butter before, don't sweat it. It's all about timing. You just melt your butter, and continously stir, and after a few minutes you will see your butter go from a yellowish color to a brownish color, when this happens take it off the heat ( DO NOT STOP STIRING) after you take it off the heat continue to stir for another 30-40 seconds. Allrecipes has good tuturial with pictures here.
For this Recipe you need:
Preheat your oven to 375 degrees

I first had these when I was a kid, my Mom would make these and they were always wonderful. I couldn't find the recipe (Which I KNOW is somewhere in my kitchen) so when I saw this on Pinterest I was forced to make them. My mouth was watering just thinking about them. I had no doubt this recipe was safe to try since it's from the same blog as the Butterscotch Gingerbread cookies I tried earlier. If you love to bake, or are looking for some awesome recipes check out Baked Perfection. It is an awesome Blog!
For this Recipe you need:
1 cup butter
1/2 cup white sugar
2 teaspoons vanilla extract
2 teaspoons water
2 cups all-purpose flour
1 cup chopped walnuts (can use pecans as well)
1/2 cup confectioners' sugar
We left out the nuts since most of the kids don't eat them, but the next batch I do think I will add them, so they won't disappear as fast!
Preheat your oven to 325 degrees.
In a medium bowl, cream the butter and sugar (Just the white sugar!). Stir in vanilla and water. Add the flour and almonds, mix until blended. Cover and chill. I put mine in the fridge for about an hour. It was pretty thick to begin with.
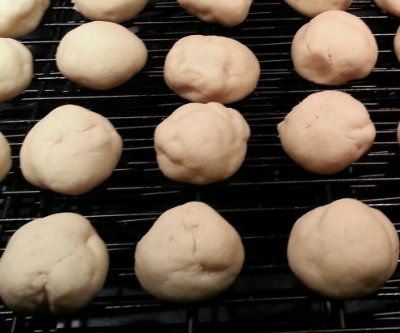
Roll your dough into balls and place on a cookie sheet. You can place these pretty close together because they don't expand very much at all. I had 3 dozen on one air bake cookie sheet. Bake for about 15-20 min. When you take them out they may not look like they are done. That is how they should look.
This is what mine looked like coming out of the oven
Let them cool, then roll them in the powdered sugar. These little critters are really simple, don't have a lot of ingredients but are so darn good it's ridiculous! My kids were literally fighting over them! It's no exaggeration to say that these melt in your mouth. I didn't even dare eat one, because I knew I would not be able to stop at just one.....or even two!
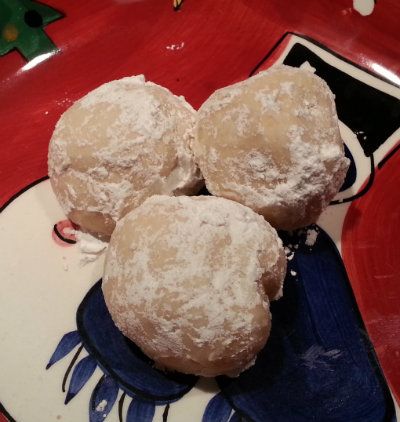
If you make these to give away, I urge you to make a separate batch to keep at home.......
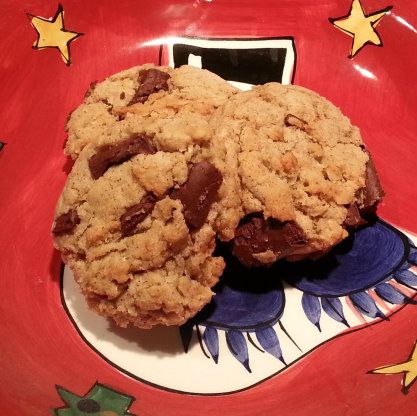
Pin 57 Brown Butter Chocolate Chip Cookies
Ok, seriously who knew that browning butter could make a cookie taste so different. Browning the butter takes the chocolate chip cookie to the "gourmet" level. After making these I wrote the recipe down in my recipe book labeled "The Grown-Up Chocolate Chip Cookie".

Now if you have never browned butter before, don't sweat it. It's all about timing. You just melt your butter, and continously stir, and after a few minutes you will see your butter go from a yellowish color to a brownish color, when this happens take it off the heat ( DO NOT STOP STIRING) after you take it off the heat continue to stir for another 30-40 seconds. Allrecipes has good tuturial with pictures here.
For this Recipe you need:
Ingredients:
1/2 cup unsalted
butter
1/2 cup
sugar
1/2 cup loosely
packed brown sugar
1 large
egg
2 tsp vanilla
extract
1 1/4 cup
flour
3/4 cup oats (not
quick-cook)
1/4 tsp
salt
1/2 tsp baking
powder
1 1/2 tsp
cinnamon
1 cup chocolate
chunks
I had planned on taking some detailed pictures of the the mixing and baking process, but my camera/phone decided to walk away. It walked away in my teenage daughter's hands whose phone broke!
Directions:
Preheat your oven to 375 degrees
In a small saucepan brown your butter. if you aren't sure how to do this follow the link listed above
In a mixing bowl,
mix together the flour, baking powder, salt, cinnamon and oats. Set
aside.
Let the butter cool, then mix with your dry ingredients. Add your chocolate chunks. If your dough is slightly sticky throw it in the fridge for about 30 min. Mine was good to go, so we skipped the fridge.
Drop by tablespoons or use a cookie scoop (love my cookie scoop!) on to your pan. Bake 10-12 minutes, or until the edges and bottoms are
golden brown. Mine were closer to the 10 min. mark, but it really does vary by oven.
This recipe made 17 cookies. These cookies are crisp on the outside and soft and chewy on the inside. The touch of cinnamon and oatmeal on top of the brown butter really dress this cookie up. One word.......YUMMY!

Pin 58 Mexican Wedding Cookies
These are one of those cookies, that I dare you to eat just one! These babies just melt in your mouth....seriously just melt in your mouth.I first had these when I was a kid, my Mom would make these and they were always wonderful. I couldn't find the recipe (Which I KNOW is somewhere in my kitchen) so when I saw this on Pinterest I was forced to make them. My mouth was watering just thinking about them. I had no doubt this recipe was safe to try since it's from the same blog as the Butterscotch Gingerbread cookies I tried earlier. If you love to bake, or are looking for some awesome recipes check out Baked Perfection. It is an awesome Blog!
For this Recipe you need:
1 cup butter
1/2 cup white sugar
2 teaspoons vanilla extract
2 teaspoons water
2 cups all-purpose flour
1 cup chopped walnuts (can use pecans as well)
1/2 cup confectioners' sugar
We left out the nuts since most of the kids don't eat them, but the next batch I do think I will add them, so they won't disappear as fast!
Preheat your oven to 325 degrees.
In a medium bowl, cream the butter and sugar (Just the white sugar!). Stir in vanilla and water. Add the flour and almonds, mix until blended. Cover and chill. I put mine in the fridge for about an hour. It was pretty thick to begin with.
Roll your dough into balls and place on a cookie sheet. You can place these pretty close together because they don't expand very much at all. I had 3 dozen on one air bake cookie sheet. Bake for about 15-20 min. When you take them out they may not look like they are done. That is how they should look.
This is what mine looked like coming out of the oven

Let them cool, then roll them in the powdered sugar. These little critters are really simple, don't have a lot of ingredients but are so darn good it's ridiculous! My kids were literally fighting over them! It's no exaggeration to say that these melt in your mouth. I didn't even dare eat one, because I knew I would not be able to stop at just one.....or even two!

If you make these to give away, I urge you to make a separate batch to keep at home.......
Monday, December 17, 2012
Pin 56 Reusing/Repurposing Empty Beer or Soda Glass Bottles into Glitter Vases
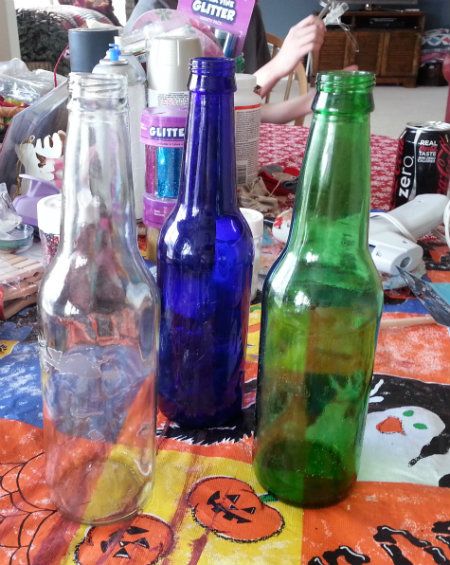
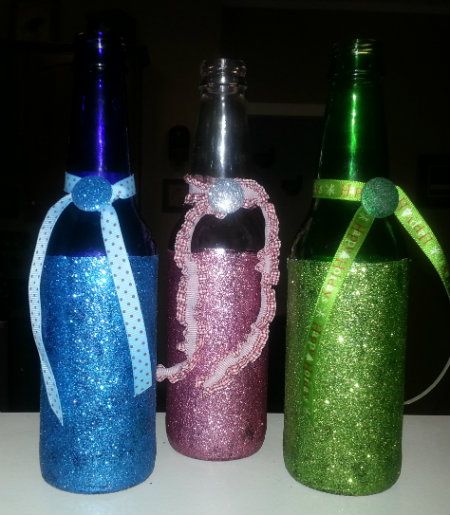
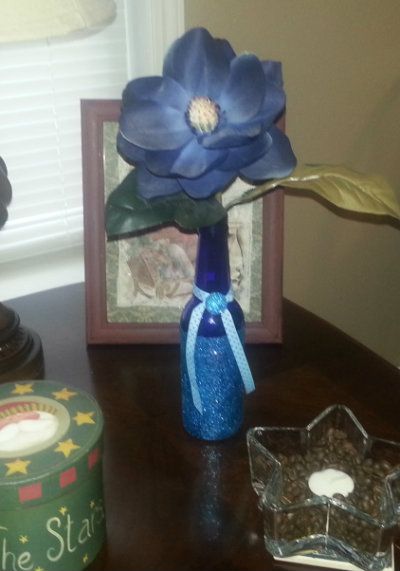
My husband is addicted to a brand of soda called Ski. Literally addicted to it, I call it his "crack". We special order this soda so he can get it in glass bottles still made with actual cane sugar. He goes through a ton so we also have bottles and bottles and bottles and bottles and bottles and bottles (you get the picture, lol) in our recycling bin. I reused some in a previous pin, Pin 33 tinting bottles with modge podge & food coloring, and wanted to try something different with a few more. I'm sure if you have followed my blog you have come to realize that I LOVE glitter, so when I saw this pin I knew I was going to have to try it.

Supplies needed:
Glass bottles (beer/soda/whatever you want to try it with)
Fine Glitter
Modge Podge or other glue/adhesive
Painters Tape
Ruler
Marker
First pull any labels off your bottles. I didn't bother to scrub off any of the sticky goo left from the labels since I was just going to be putting sticky goo back on the bottle to hold the glitter.
I then grabbed a ruler and a sharpie and measured where I wanted my tape to go. It's not necessary to measure if you can create a straight line buy just eyeballing it.....I just don't have that ability.
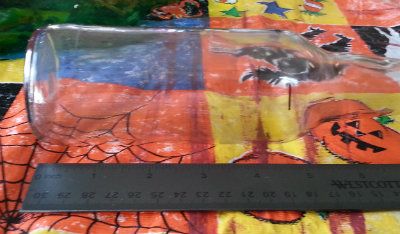
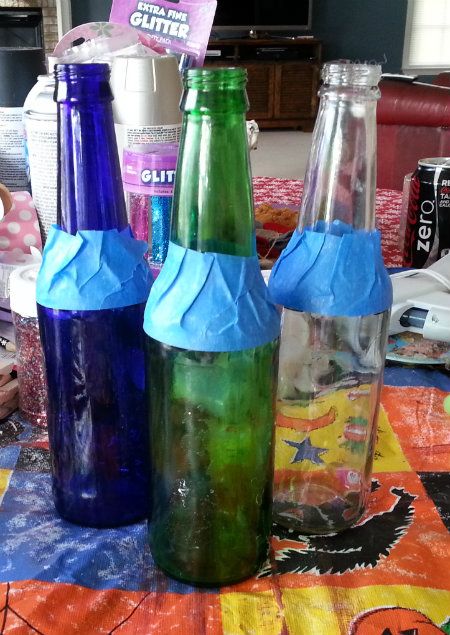
If you mark your bottle make sure you place your tape just above the lines so the glitter will cover up the marks. Tape around your bottle.
Now a smart person would have thought ahead and dished out some modge podge and mixed glitter into it, then brushed it on. If you do this you will want a lot of glitter (at least I would, he he!) I did mine by brushing modge podge on the bottles in strips.
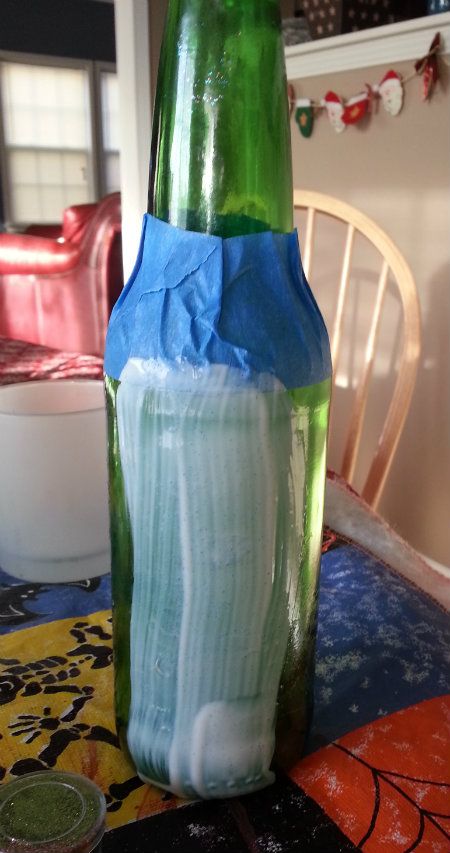
Then sprinkle the glitter on to the area. Then just repeat glue followed by glitter till you go all the way around the bottle. I wanted a very thick coat of glitter so I actually put modge podge on top of the glitter that was already on the bottle and sprinkled on even more glitter.
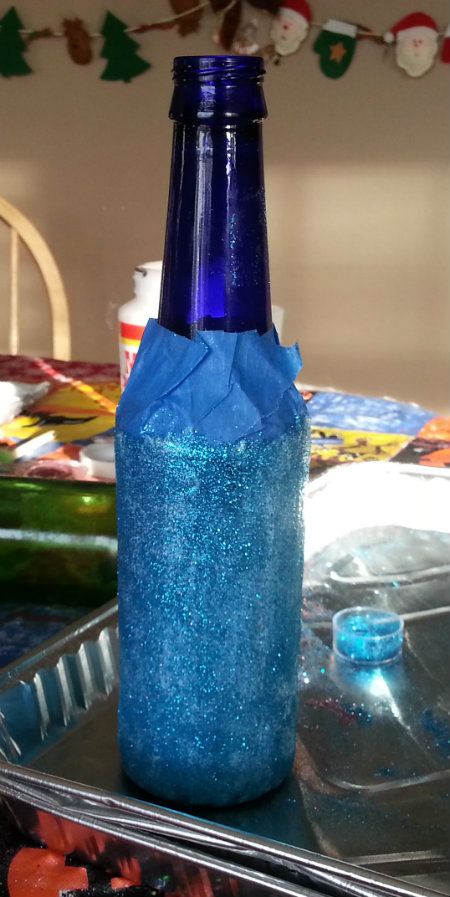
Let the bottles dry. Do not do what I did and forget about taking the tape off till they were completely dry. You will get a much cleaner edge if you remove the tape while the glitter/paint is still damp.
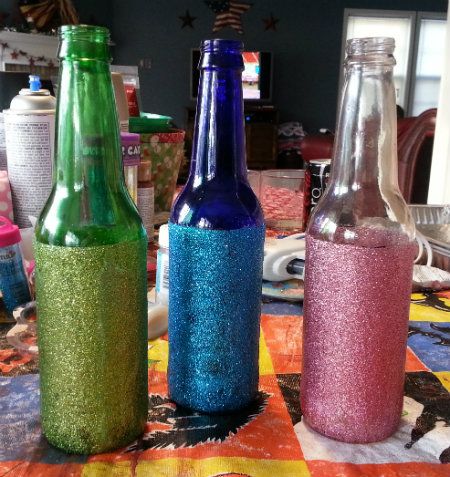
My girls wanted to add some embellishments so I let them, but I actually dont' mind them plain. These will be getting re-used as small vases. They are good for lone flowers. My girls have been wanting me try duct tape flowers so we might make some to put in these. (I wonder if I could glitter those?)
With a flower..
Since everything but the glitter came from stashes or the recycling bin this was a very economical project.....we spent $1 on the glitter at Michael's. I would probably do this again and again but I'm not sure where I would put them all.
Supplies needed:
Glass bottles (beer/soda/whatever you want to try it with)
Fine Glitter
Modge Podge or other glue/adhesive
Painters Tape
Ruler
Marker
First pull any labels off your bottles. I didn't bother to scrub off any of the sticky goo left from the labels since I was just going to be putting sticky goo back on the bottle to hold the glitter.

I then grabbed a ruler and a sharpie and measured where I wanted my tape to go. It's not necessary to measure if you can create a straight line buy just eyeballing it.....I just don't have that ability.

If you mark your bottle make sure you place your tape just above the lines so the glitter will cover up the marks. Tape around your bottle.

Now a smart person would have thought ahead and dished out some modge podge and mixed glitter into it, then brushed it on. If you do this you will want a lot of glitter (at least I would, he he!) I did mine by brushing modge podge on the bottles in strips.

Then sprinkle the glitter on to the area. Then just repeat glue followed by glitter till you go all the way around the bottle. I wanted a very thick coat of glitter so I actually put modge podge on top of the glitter that was already on the bottle and sprinkled on even more glitter.

Let the bottles dry. Do not do what I did and forget about taking the tape off till they were completely dry. You will get a much cleaner edge if you remove the tape while the glitter/paint is still damp.

My girls wanted to add some embellishments so I let them, but I actually dont' mind them plain. These will be getting re-used as small vases. They are good for lone flowers. My girls have been wanting me try duct tape flowers so we might make some to put in these. (I wonder if I could glitter those?)

With a flower..

Since everything but the glitter came from stashes or the recycling bin this was a very economical project.....we spent $1 on the glitter at Michael's. I would probably do this again and again but I'm not sure where I would put them all.
Saturday, December 15, 2012
Pin 55 Using Glue Dots & Glitter To Upcycle old Glade Candle Jars
A little while back I showed how to clean out your old candle jars ( Pin 22). It took me a while to figure out what I wanted to do with them. The bigger ones I knew I wanted to put in the kids bathroom for cotton balls & qtips, but the smaller ones I figured would still hold candles. I didn't want them to be boring, but couldn't figure out how to spruce them up. I searched through my pins, but nothing really "spoke" to me. So I sat staring at my screen, all my boards were pulled up, I was just staring and staring at all the board covers.....why was nothing moving me?!?! I had been concentrating on my craft, upcycle and for the home boards. Turns out I should have been paying attention to my Easter board. My poor Easter board only has one lonely pin, but turns out it was just the pin I needed.

Now I know that these are Easter Eggs, but they gave the inspiration to put glitter polka dots on my candle holders. All you need is Glitter, which I love, and Glue Dots, which I love!
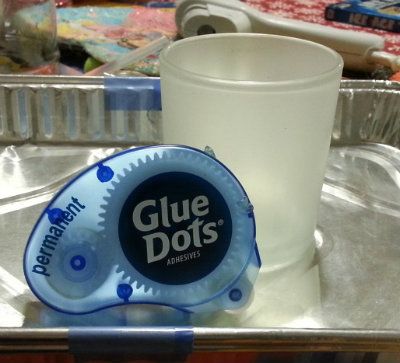
Take whatever container you have that you would like to add glitter polka dots to and make sure it is clean. Then just place your glue dots where you want them. Ignore the spray paint on my hand, and the glitter I already managed to get on the candle.....(What can I say, I'm just having a messy day!)

Now it's time to glitter......I LOVE glitter! Fine glitter worked much better. The easiest way I found to apply the glitter was to dip my finger in it then tap it onto the glue dot. It wasn't as messy this way, and the glitter stuck better since I was pressing it into the glue dot. This is a really quick project.

Ignore the fact that I didn't really brush the loose glitter off yet.......I was in a hurry to move on to my next one. Trying to finish up crafting for the night so the kids and I can settle in and watch Ice Age Continental Drift. Gotta love family movie nights, especially when they will be illuminated by my newest glitter polka dot creations.
Subscribe to:
Posts (Atom)