Wednesday, February 6, 2013

Pin 81 FOE Knots for hairties or bracelets

Things have been totally hectic.  Wrestling season is in high gear and I can't seem to get all the kids healthy at the same time.  They have been taking turns being sick.  Crafting time has been hard to come by lately.   I needed to find a pin that would be simple, quick and return a product that could actually be used.  With 3 girls we go through a ton of  hair elastics.  It seems no matter how many I buy they end up missing when they are needed.   So this pin for FOE (Fold Over Elastic) Hair Ties seemed perfect. 


These couldn't be simpler......It's one of those projects where you pretty much get instant gratification.   The peeps over at ohsoprettythediaries have an easy to follow tutorial. 

What you need to get started:

FOE- You can order some from etsy or Micheal's carries some. 
Scissors
Lighter
Ruler

 photo d75cd5b0-53c3-4045-8b77-6727ee2e636c_zps772db057.jpg

Unwrap your foe and measure out the amount you want.  A pretty standard measurement seems to be 8.25".  That did not work for us.  All my girls have thick hair, so we went with 9".  That was perfect,  it also allowed them to be worn on the wrist comfortably.

 photo c38f53e5-023d-4afa-b4cb-570dc0f990b1_zpsd4628079.jpg

Once you cut your FOE I suggest sealing the ends.  Doing it now will prevent you from causing any fraying while you are tying your knot.


 photo 4452ea49-a6a4-4ed9-bcca-7e2518ac81ab_zps9dc97d82.jpg

Next you just tie your knot.   You are basically going to tie it just like you would tie a balloon.

 photo fd82b246-b0e4-42cc-9932-29281f888d74_zpsade75f91.jpg

And your all done.

Unless you are making a huge amount for a craft fair.........


 photo 0d0bb942-03f7-416f-aa04-175d1916bce8_zps0a376c47.jpg


Follow Me on Pinterest

Tuesday, January 29, 2013

Pin 80 Organizing Marabou with a Hanger and Shower Hooks

Anybody who has ever worked with marabou knows that it can be a royal pain in the butt.  We use it regardless because there is nothing that dresses up a bow quite like it.   It's is even beautiful all alone, taking center stage as a marabou puff.  Once my girls had marabou puffs in one color, they needed them in all the colors.   This left marabou laying around in my craft room.   Every time I would pull out a piece "fluff" would fly everywhere.  I needed a good way to store my marabou that would keep it neat, easy to get to, and easy to see.  I pinned a pin a while back to organize all our ball caps.   It got me thinking (dangerous, I know!) that I could use this idea for marabou.


It couldn't be simpler.......just a hanger and some shower hooks.  I already had the hanger and just needed a box or two of shower hooks.  I picked my shower hooks up at the Dollar Tree.  

Hanger and shower hooks to be used to organize marabou photo Hangerandshowerhookstobeusedtoorganizemarabou_zpsd4a2fab9.jpg

I slipped the shower hooks onto the hanger.

Shower hooks on a hanger to organize marabou photo Showerhooksonahangertoorganizemarabou_zps8d54fa20.jpg

Then I just put one color of marabou into each shower hook and I was done.

Marabou organized using shower hooks and a hanger photo Marabouorganizedusingshowerhooksandahanger_zps187dce3f.jpg

Simple, quick and cheap.........easy way to get organized.  I think I might actually use this for our ball caps and belts too.


Follow Me on Pinterest

Thursday, January 24, 2013

Pin 79 Homemade Laundry "Sauce", Easy Super Concentrated Detergent

Now you might ask why would I make another "recipe" for Homemade Laundry Detergent so soon after I just made the "no-grate" laundry detergent, well the truth of the matter is that I just couldn't help myself.  When looking for recipes I had decided on the Sauce and the No-Grate, and thought it would fun to compare.  Yes, yes indeed, I just used the word fun relating to laundry!  I promise I'm not crazy, and laundry is by no means my favorite chore,  with 6 kids (multiple involved in sports) an Army husband, 2 dogs & 2 cats, laundry piles up every minute.  Trying out new things in the laundry helps at least keep it a little more interesting.


I was intrigued by the fact that this is a laundry sauce, not a true liquid.  I was drawn to the idea that it didn't fill a big 5 gallon bucket.   It fits in two, 1 quart mason jars or into a Tupperware container that can fit on your shelf.   I opted to put mine in a Tupperware container because it is thick and I didn't want to get it all over my hands when I got to the bottom of the jar. 

I didn't take super detailed pictures of the creating process, because the folks over at Budget 101 have a super detailed tutorial along with pictures of every step.  It's really simple, and it didn't take me long to make at all.
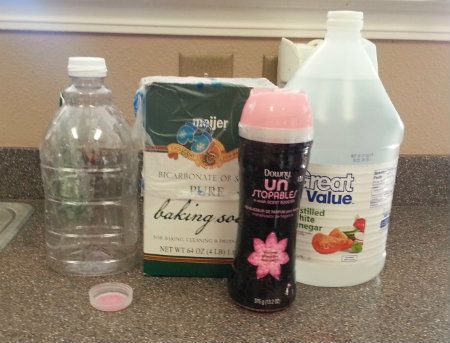
Ingredients

1C Borax
1C Washing Soda (not the same thing as Baking Soda)
1 Bar of Fels Naptha
4C Water (with additional water added in later)

Gather everything you need.   Ignore all the extras in the picture (we'll consider this my "stock" photo of my laundry supplies)

Everything needed to make Homemade Bleach, Homemade Fabric Softener, Homemade Laundry Detergant photo EverythingneededtomakeHomemadeBleachHomemadeFabricSoftenerHomemadeLaundryDetergant_zpsd14809f0.jpg

First thing your going to do is put 4 C of water in a saucepan and bring it to a slight boil.  While your water is heating up your going to grate your bar of soap.  This is where things can get tricky.  Some people like to cut the bar into chunks and use their food processor to do the rest, others have put in through their salad shooter.  I personally have come to like putting the bar of soap in the microwave.  I put it in a Ziploc bag (not sealed)  and heat in 30 second increments.   Your bar will start to foam and crack, once this happens it becomes easy to break.   I took my bag out of the microwave, let it cool for a few minutes, then sealed the bag.  Once the bag is sealed and you have gotten the air out of the bag you can use a rolling pin, hammer or any other means to "beat" the bar of soap.   Because it's been dried out in the microwave it usually crumbles pretty quickly.

Add your soap to the boiling water and stir.  You will have to stir pretty constantly to keep the soap and water from boiling over.  It took me about 10 minutes to completely melt the soap.   Once this is done remove it from the heat.

Bar of soap melted in water to be used in homemade laundry detergant "sauce" photo Barofsoapmeltedinwatertobeusedinhomemadelaundrydetergantsauce_zpsc11a76ae.jpg

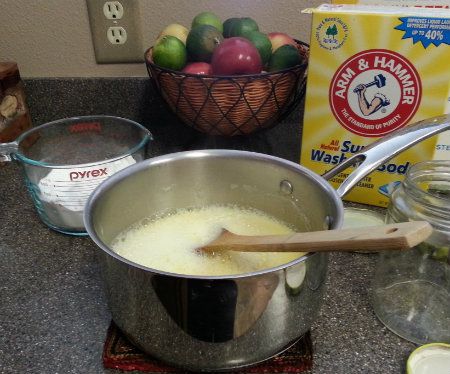
Stir in your 1 C of Borax and 1 C of Washing Powder.  I had to stir for about 4-5 minutes.  Stir it till you no longer feel like there is sand on the bottom of your bottom pan.  Washing Soda is a lot more coarse then baking soda and takes longer to melt and blend. 

Once I decided against using glass jars I realized I needed another method to figure out how much water I needed to add in the next step.   It took a little math.   There are 4C in 1quart.   You were supposed to pour your liquid into 2, 1 quart jars evenly.   That would be about 2 C in each jar, so to fill your jar you would be adding around 2C more of water.   So to add water to my whole batch without separating into jars I needed to add 4 C of water.   Could you follow that?  Lol,  I had trouble just writing it (too early in the morning!) So add  4 C of water and stir it in.    Then just let your mixture cool a bit.

Laundry sauce recipe all mixed up and cooling photo Laundrysaucerecipeallmixedupandcooling_zps4ebd5321.jpg

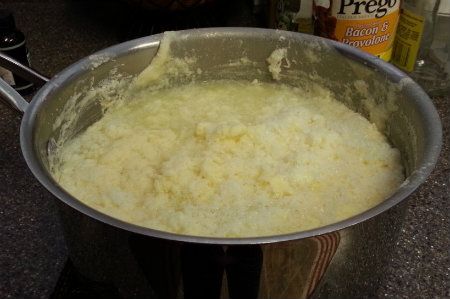
Mine didn't take long to cool at all because I threw mine out on the deck for a few minutes.The freezing temps we are having might have something to do with that.   Now you can see that it looks weird, it is separating and looking slightly grainy, don't sweat it.  We are going to take care of that in the next step.

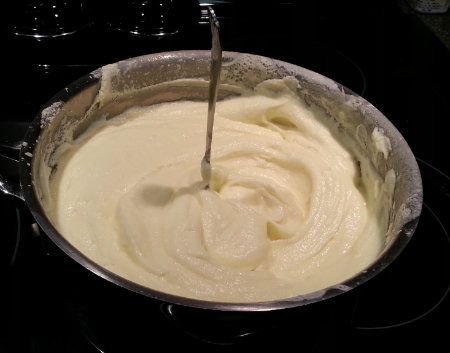
You can use a blender, immersion blender, or a mixer, whatever is the easiest for you.  I used my immersion blender.

Immersion blender getting ready to whip up some laundry sauce photo Immersionblendergettingreadytowhipupsomelaundrysauce_zpsb859a678.jpg

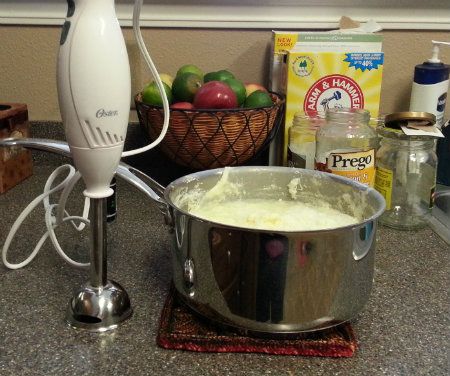
Just mix up your detergent.  I mixed mine for about 3 minutes.   It should start to look like a pudding texture.   It's really weird when you remember this is going in your laundry.....

Laundry Sauce all whipped up and ready to go photo LaundrySauceallwhippedupandreadytogo_zps902054cd.jpg

I just threw mine in some extra Tupperware containers.  I have a front load HE machine.   This recipe is a low suds recipe and is safe to use.  The thing to remember is you only use 1Tablespoon per load and you do NOT put it in the detergent dispenser, but directly into the drum.  It is too thick to go through dispenser properly.

So far I have used this in 6 loads of laundry, and it has worked just fine.  I haven't noticed any difference between this and any of the commercial detergents I have used.  I do like this slightly better then the no grate.  I don't know that it ACTUALLY does a better job, but it just feels like it must do a better job since it's so thick! 

This recipe supposedly makes enough to wash 128 loads.   I paid about $1.00 for my bar of soap, but I can't tell you the price of my borax and washing soda, since they are the same boxes that I have had for about a year now, and have used to make various cleaning recipes.

If you are wanting to try a homemade detergent, I definitely recommend this one!


Follow Me on Pinterest


*I am by no means an expert in anything, so use caution when trying any new cleaning recipe.  I can only share my experiences.

Wednesday, January 23, 2013

Pins 77 & 78 Homemade Fabric Softener and Homemade Liquid Laundry Detergent without grating soap

Fingers crossed that this time my oldest Son is actually truly over being sick.  We spent the last week shuttling between Dr's, ER, and the pharmacy.  It never feels good when the Dr's guess at what your child has.  When any of my kids get sick I use cleaning to relieve my stress.  Everything was getting washed.  I washed so many clothes, blankets, etc. that I ran out of detergent and softener, but couldn't really run out and get more.  If I went out it, it meant my son had to.  I had tried homemade "powder" detergent and homemade fabric softener before, but wasn't impressed.  It was time to try again, but this time I knew I wanted to try a liquid detergent and wanted to see if I could find a fabric softener recipe that didn't call for hair conditioner.  Pinterest to the rescue!

 Pin 77 Homemade Fabric Softener


I have found pretty much anything posted by on the One Good Thing by Jillee blog is worth trying.  If you have never stopped by her blog it is worth a visit, but be prepared to be glued to your computer because it is full of fantastic information. 

I gathered everything I needed for all my projects for the day.  I was making Detergent, Bleach, and Softener. 

Everything needed to make Homemade Bleach, Homemade Fabric Softener, Homemade Laundry Detergant photo EverythingneededtomakeHomemadeBleachHomemadeFabricSoftenerHomemadeLaundryDetergant_zpsd14809f0.jpg
*ignore the bar of soap in the picture, that is for another laundry detergant recipe


Ingredients:

6 C Distilled White Vinegar
1 C Baking Soda
1/2C  Downy Unstoppables or Purex Crystals


My First step was to separate what I needed for the Fabric Softener, which was Distilled White Vinegar, Baking Soda, Downy Unstoppables and a bottle to hold everything (an extra large Coffemate container was perfect!)

Ingredients needed to make your own Homemade Fabric Softener photo IngredientsneededtomakeyourownHomemadeFabricSoftener_zps2a9ffc60.jpg

Take 1/2 C of Downy Unstoppables and add it to 1 C of hot water.   My tap water was not hot enough to melt them, so I had to microwave mine a bit.   Next time I will just boil some water in my kettle and use that. 

Downy Unstoppables being turned into Homemade liquied fabric softener photo DownyUnstoppablesbeingturnedintoHomemadeliquiedfabricsoftener_zps04498b10.jpg

In a separate big bowl you are going to mix your 1 Cup baking Soda and 6 Cups Vinegar.  Make sure when you add your vinegar you do so one cup at a time, and pour it in slowly.  If you do too much at one time you will have a big fizzy mess on your hands.

Baking Soda and Vinegar reacting while making fabric softener photo BakingSodaandVinegarreactingwhilemakingfabricsoftener_zps107c7bbd.jpg

Once you have all your vinegar mixed into your baking soda stir in your melted Downy Unstoppables.

Baking Soda, Vinegar and Downy Unstoppables mixed together to make fabric softener photo BakingSodaVinegarandDownyUnstoppablesmixedtogethertomakefabricsoftener_zps38a2cb0d.jpg

Stir it all together, then pour it into your container of choice.

Homemade Fabric Softener photo HomemadeFabricSoftener_zps92c7d5a4.jpg

This mixture will settle a bit, so make sure you choose a container that will allow you to give a few good shakes before use.  I can't say I really measure how much I use. I just fill my dispenser.  So far so good.  My clothes smell and feel great.   It's not really a step towards being more natural since I'm sure there is nothing natural about the Downy Unstoppables.  I already had them on hand and it was worth a shot.   While this "recipe" is not more natural it is more economical, plus it is simple and doesn't require much time at all. 


Pin 78  Homemade Liquid Laundry Detergent that doesn't require grating soap


Once again another great pin from One Good Thing by Jillee.   The thing I liked most about this recipe is that it doesn't take long to mix together,  no sitting and waiting on things to cool, separate and remix like some recipes.   And no GRATING!!!!   Not that grating a bar of soap is hard, but it is boring and at times can be slightly time consuming.  I have heard though if you microwave your soap for a little bit you can then just smash it into a million pieces but have never tried it.  If you have I'd love to hear exactly how you did it!

Ingredients

3Tablespoons Borax
3Tablespoons Washing Soda
2Tablespoons Dawn or other liquid Dishwashing Detergent
4 Cups Boiling Water
1 Gallon Container

Ingredients needed for a no grate homemade liquid soap photo Ingredientsneededforanogratehomemadeliquidsoap_zps044f24b7.jpg

First I put water in my kettle to boil.  While I was waiting on it to boil I put my Borax and Washing Soda into my container.

Borax and Washing Soda in container to made into laundry detergant photo BoraxandWashingSodaincontainertomadeintolaundrydetergant_zps923af7ce.jpg

Pour 4 cups of boiling water directly into the container.  Shake the container a little bit to mix up all the borax and washing soda.   Let it cool some, and then add enough water to fill up your gallon.  You will want to leave just a bit of space, because now you'll add your 2T of dish soap.   I used Mrs. Meyers in Lavender Scent.   I like to add mine at the end because then you don't have the sudsing when you fill your container with water.  Just give it a few good shakes and your are good to go.

This will make a runny detergent, it will not be thick like store bought detergent.  This does not mean it doesn't work.  It has worked just fine for me.   I double my cleaning ingredients,  to make a higher concentration.   Once again I do not measure how much I use I just eyeball it as I add it to my dispenser.  I would guesstimate I use about a 1/4C to 1/2C, definitely not more than that.  I have an HE front loader and this is a low suds product and hasn't given me any issues.  However, everybody has different washers, so just pay attention to the amount of suds your washer is producing and judge for yourself. 

Homemade Bleach, Laundry Detergant and Fabric Softener photo HomemadeBleachLaundryDetergantandFabricSoftener_zps1bf53897.jpg

I am happy with my detergent and softener, though I do think my packaging needs a little work!

I shared the recipe for Homemade Bleach back in Pin 19 (click here for post).


Follow Me on Pinterest

Wednesday, January 16, 2013

Pin 76 Making your own Tabletop Air Freshener with Baking Soda & Essential Oils

I really am loving today's pin.   I really like this one for two reasons.  First the scent lasts a remarkably long time (especially since these are natural) and second because I can re-use the ingredients from this pin in another pin.  Waste not, want not.

I really love pretty smells, and one of the hardest things for me is easing away from the chemical ridden smells, which just about every air freshener and plug in is filled with.  I feel relaxed when I walk in my home and it smells good. 

I was so happy when I found this pin from The Burlap Bag that tells you how to make your own tabletop air freshener from just two simple ingredients.  Baking Soda and Essential Oils are the star of the show. 


You could really put this in any small container, but I wanted something that I wouldn't mind sitting on my counters or my end tables.  I gathered everything I wanted to use.

Everything you need to make your own table top air freshner with  baking soda and essential oils

I used:

Small Canning Jars
Essential Oils
Baking Soda
Tulle (To cover the jar)
Twine (To tie around the jar
Scissors (To Trim the Tulle)
1/4 C measuring cup

This really is simple, and doesn't take more than a few minutes.   Put a 1/4 C of Baking Soda into each of your canning jars (or whatever container you choose to use).  Put 8-10 drops of your choice of essential oils into each jar.  I used peppermint, lavender and sweet orange (not together). 

Baking Soda in small canning jars sprinkled with essential oils, homemade tabletop air freshners

I then cut small pieces of tulle to cover the tops of the jars.   I happen to have a lot of tulle from projects with my girls, but you can use anything that you can put holes in on the top.   You want the scent to be able to spread and the baking soda to be able to absorb the "bad" odors.  After I trimmed the tulle,  I cut a few pieces of twine to tie around the tops.  The tulle and the twine are just eye candy.

Do it yourself tabletop air freshners made with baking soda and essential oils

If after a few days you don't notice the scent anymore, just pick up the jar and give it a little shake.  Mine have lasted for about 10 days.  You could also add a few more drops of essential oils if you wanted.

When my air fresheners loose there smell I take them and dump them into an old Parmesan cheese container.   Baking Soda makes a fabulous scrub for sinks and stove tops.  I talked about this in a previous pin, located here.  When you scrub with the baking soda from the air fresheners, the scent comes out, so it's like using a scented cleaner, but a natural one.

Baking soda from tabletop air freshners being reused a sink and oven scrub


Follow Me on Pinterest

Tuesday, January 15, 2013

Pin 75 Do it Yourself Febreeze with a Printable Label

Mondays are pretty much weekend recovery days.   I spend a lot of the day picking up and cleaning.  I was finishing up the downstairs, walked into the pantry to grab my handy bottle of Febreeze.  I picked up the bottle and for some reason I looked at the ingredients.   I'm not sure why I did.  Maybe it's because I've slowly been trying to go "green", or it could just be because I picked the bottle up backwards. Whatever the reason the things I saw were a little scary.  The amount of ingredients were scary in and of themselves.    I don't like reading ingredients and having to look them up. I want to to be able to recognize them and know what they are.  I figured there had to be a better option out there.

I stumbled across this first.....


 It sounds like it would work, and if you visit Homemade Mama's blog  you will find a recipe for homemade Febreeze that uses just a small amount of liquid fabric softener, baking soda and water.  Simple enough, but the more I thought about it I decided to look for something different.  If I'm trying to make the move away from commercial products I wanted to find something I could use that didn't require a commercial cleaner/softener.  Though I will be keeping my eye out for greener fabric softeners because I know ultimately I won't be able to help myself and will want to try this!

I kept searching a bit and finally found this pin.....


This was more along the lines of what I was looking for.  It only requires Water, Vinegar and your choice of Essential Oil.   I'm usually a lavender kinda girl, but I chose to go with Sweet Orange instead. 

The Recipe is listed over at Country Momma Cooks.  Stop on over and give the blog a visit.  I promise it will be a pleasant experience, and she has other great ideas for getting "greener"  with your cleaning & laundry.  She is also extremely generous and has a pretty printable label ready to go for you to print out and put on your bottle.

Just gather everything you need:

1/2 C  Vinegar
1 1/2 C Water
12-15 drops of Essential Oil
Spray Bottle

All the ingredients needed for a homemade air freshner

Pour everything in your spray bottle and give it a shake, then spray away.  I did notice when I first sprayed it I could smell hints of vinegar, but it quickly faded.  Now this spray isn't going to give you a "heavy" perfumed smell.  It's going to give you a light fresh clean scent.  This for me will be the hardest part to get used to.  But I didn't mind the smell the freshness.   I'm slowly getting used more natural smells.

*Because this contains an oil & vinegar you will want to give the bottle a good shake before each use.


Follow Me on Pinterest

Monday, January 14, 2013

Pins 73 and 74 Crochet Owl Hat Free Pattern and the Crochet "Divine" Hat Free Pattern

Yesterday I got all my errands run, and reclaimed most of my house (which took FOREVER) but I failed to put away all the Christmas Decorations!  Am I the only one that hates taking down all the decorations?  It's not that I hate putting them away, I'm just not a fan of how empty and boring everything looks when they are gone.  It always makes me a little sad.  So I decided to put my time to a "better" use, and search my Pinterest boards for a few projects......


Pin 73 Crochet Owl Hat


Over the Christmas Break it snowed, and it snowed a lot.  In fact we still have piles of snow everywhere.   Don't get me wrong, I love the look of a fresh snow, but it's been around a while and it's starting to look messy, dirty snow isn't so pretty........Oops!  Back on point, because of the snow and cold everyone was wearing hats everywhere we went, and my children have a real talent, losing their hats.  I'm not lying when I say we probably lost about 10 hats over a 2 week period.  Which is really sad because with everyone sick we pretty much only left the house for hospitals, dr's appts. and trips to the grocery store and pharmacy.    The girls have been asking for an owl hat for ages, so I was happy that I happened to have a pin for one that included a free pattern!


If you have never stopped by the Repeat Crafter Me blog, you have to go visit it.....It's a fantastic blog, and has some really great projects for you to try.  This blog offers the owl hat pattern in many sizes, ranging from newborn to a large adult.

Since there are such great instructions and pictures on the Repeat Crafter Me blog, I didn't take any pictures of the actual process.  It also would have been hard to take pictures, since I started working on this while I was in the car waiting on one of the kids to get out of track practice, then again while waiting on another to get out of wrestling practice.   I love projects that I can throw in my purse and work on while I wait! 

The whole hat took about an hour.  I decided to try the Teen/Adult size.  I'm glad that I didn't go any smaller.  The hat snugly fit my 8 & 9 year old girls.  Any smaller and they wouldn't have fit at all.  Next one I do I will increase the initial round by a few stitches.   I admit I crochet extremely tightly so this could have been part of the issue.   I'm also a lazy crocheter, I do not tend to check my gauge when I'm crocheting for me and mine.....If you follow the teen/adult hat I found that starting with 10 DC in the magic ring, then following the same formula for increase led to a more comfortable fit for my girls.

 Now I have to say I wasn't impressed with the hat at all.....then I attached the eyes and the owl hat started to come to life, but once you attach the nose it really all comes together, so if you start the hat and you think it's boring hang in there till your all finished! It's will be worth it!

Crochet Owl Hat before the Eyes and Nose have been added

Finished Crochet Owl Hats on Girls made with Free Pattern

When it came to the eyes, I opted to do the center of the eye brown instead of using buttons.  I like the look better.   I didn't measure anything, I just laid the eyes on the hat where I thought they looked best and used a piece of yarn and "sewed" them on.   I had cut my tail to short, or I would have used it to attach the eyes to the hat.   Once the eyes were on, I made and attached the nose.

Finished Pink Crochet Owl Hat made with Free Pattern

Currently working on one in Ohio State Buckeye Colors.  Hope that it turns out as cute as I think it will.


Pin 74  The Crochet Divine Hat


Ok so in all honesty I have made this hat before.....many times. This is, and has been, my go to hat pattern if I need a hat in a hurry.  I'm fitting it into my blog since I have it pinned to my Pinterest Boards.  This pattern works up quickly, and looks fine without any embellishments.   The spiraling of the hat really stands out.  


Do not be fooled by the picture.  This really is one of those things that looks so much better in person.
The pattern is shared for free, in Adult, Preemie and Infant sizes at Rheatheylia.  For the adult hat I add one more round of the spiral, and one more round of the bottom edging.

The "Divine" hat looks great plain, but my girls loved adding flowers to their hats.   So we added a few, the other hats they want me to add pom-poms too, but I haven't gotten to that yet.

Lot of Crochet Divine Spiral Hats Another Lot of Crochet Divine Spiral Hats made with Free PatternCrochet Divine Spiral Hate made with Free Pattern before Flower

I just got to love my girls......they just woke up for school this morning and I realized that I had somehow deleted the pictures I had taken before so they put on a few of the hats for me before they were even really awake. 

The girls modeling their Crochet Divine Spiral hats made with Free Pattern

For me, this hat took about an hour start to finish.  Now I'm off to make a few more hats.......


Follow Me on Pinterest