Friday, November 30, 2012

Pin 35 Chocolate Chip Cookies

Have made my fair share of Chocolate Chip Cookie recipes over the years.  With 6 kids we go through a lot of cookies!  For the longest time I would keep reverting back to the Nestle Toll house Cookie Recipe.  Then one day while going through recipes at AllRecipes.com I found this.

It differed from the normal recipes I used....It has Cream of Tartar in it and it has you dissolve your baking soda in hot water before you add it in.  Seemed a little odd to me, but why not give it a try!

 
Once again, gather everything you need, and put it away as you use it.  If your like me and forgot to set out your butter, your first step will be putting it in the microwave for a few seconds.
 
Butter to be briefly heated

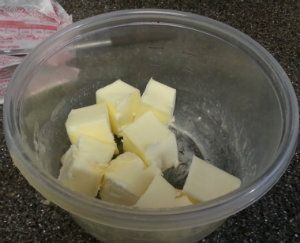
It's important that you only put it in for a few seconds.  I think I did 10-15.  You just want to slightly soften it, not melt it.  Dump it in the bowl for your mixer, then add your white and brown sugar.


butter with brown and white sugar

Once you have creamed the butter and sugars add in your vanilla and your eggs one at a time. Next get a small bowl and put your baking soda in it, then add your hot water and dissolve. Then add it to your main bowl.

Baking Soda dissolving in hot water for cookies

Add in the rest of ingredients and remove the bowl from your mixer....You should have a pretty stiff cookie dough.

Cookie Dough without the chips

Add in chocolate chips of your choice.  I went with the first thing I grabbed. I left out the nuts so all the kids could eat these cookies. 

Chocolate Chips being added to the cookies

I prefer to bake my cookies on air bake cookie sheets.  They help prevent me from burning the bottoms of the cookies.  I also always use a cookie scoop.  This saves me from hearing "His cookie is bigger than my cookie" 

Airbake cookie sheet and cookie scoopChocolate Chip cookies getting ready to go in the oven


The recipe says they take around 10 minutes to bake.  Every one's oven is different.  I set my first tray at 9 min. then checked on them.  On average they took around 12 min. in my oven.  Can I say Thank Goodness for oven timers!  If I didn't use mine I would ruin so much food.......I get too easily distracted.

Fresh Baked Chocolate Chip Cookies

Just let them cool a brief minute, then remove them and put them on cooling racks.  Make sure you test one before they are completely cooled off.....It's a must!   This recipe made 31 cookies.  I think they are pretty darn good.  The kids were in LOVE with them.  They asked for more this weekend.

Follow Me on Pinterest

Thursday, November 29, 2012

Pins 33, 34 Tinting glass bottles with Food Coloring & Modge Podge and Coffee Filter Snowflakes

I always seem to have a ton of bottles on my counter.  My hubby special orders soda that comes in glass bottles, still made with real sugar.   I call it his "crack"!   There are always so  many that I have been trying to figure out what to do with them.   I want to glitter some and texture others, but I just wasn't in the mood for that today.......so I thought I would try this


I figured it would work with a soda/beer bottle.  Only problem was I would have to paint the outside instead of the inside.  I knew I would drive myself crazy if I tried to do the inside.

I poured some modge podge into a small glass bowl, then added my food coloring.  I hadn't really planned on a color, I just grabbed the first food coloring that I saw. Kind of funny that it was same color as the pin.

Modge Podge with Food Coloring

At first I thought I would just do a portion of the bottles, but after a few minutes I decided to just paint the whole bottle.  I did two coats, and let them dry in front of the fireplace so they would dry quickly.

Red tinted bottles done with modge podge
Ignore the blue bottle.......

I knew that they needed dressed up a little so I grabbed my burlap, some scrap material and some rusted jingle bells.

Decorated Red Modge Podge Tinted Bottles

I still wanted to add a little more to them.......
Source: via Karen on Pinterest

I figured I still had a lot of coffee filters left from my wreaths so this could be the perfect filler for the center of the bottle.  Super simple, cut however you want.  There is no right or wrong pattern.  Once I had it cut I just went back to my handy dandy modge podge and slapped it on the bottle

Snowflake waiting to be put on bottle

I will say that this is something that looks much better in person.  I will set the bottles somewhere in my house.  These are not my favorite project.  Outcome is just ok to me....

Finished red tinted modge podge bottle with snowflake

Follow Me on Pinterest

Wednesday, November 28, 2012

Pin 30, 31 & 32 Oven Cooked Bacon, French Toast Muffins & Lemon Poppysead Muffins with glaze

Winter Colds & Strep Throat have entered the house......I just love this time of year!  NOT!!!  2 youngest have winter colds bordering on the flu and I was lucky enough to receive the gift of strept throat.....Freezer and cupboards are looking a little bare since I have not wanted to go to the grocery store.  We seem to have plenty of everything except breakfast items.  We have a ton of cereal, but the kids are not wanting to eat it.  I decided to go through my pins.  I just knew I could find something I could make that would buy me a few more days away from the store.  I settled on these....

and last buy not least


I tried to pick things I knew the kids would eat without any prodding......

I didn't take any pics of the proceess,  I just wasn't up to it.  They both were pretty straightforward recipes.  I will say with the French Toast Muffins, the batter was more dough like then I expected, but they turned out fine. 

Half the kids won't stay out of the Lemon Poppyseed Muffins.  They like the sweet tartness of them.  They were heating them up, cutting them in half and putting a little butter on them.  They were nice and moist.  Yummo!

Lemon Poppysead Muffins with Glaze

The French Toast Muffins were really good too!  I mean you dip them in melted butter then cinnamon.....how could they possibly be bad?  I baked mine with liners, but next time I will actually do these just in the pan so I can roll the whole muffin in the cinnamon.  Don't eat the top separately....eating the cinnamon with the whole muffin is what really makes these "pop"  I dont' think they tasted like french toast, more like a pancake.  These were a big hit though, and have already been requested again.

French Toast Muffins
French Toast Muffin unwrapped

I had intended to make one more breakfast muffin, and started the process but just felt too darn bad to finish it.  When I thought about it later I couldn't because the kids ate all the BACON!!!

Most people think of putting their Bacon in a frying pan, which I have always hated.  I love the taste of bacon, but the smell of it frying always has made me want to gag.  I think I get that from my Mom.  She is the same way.  I saw this pin, and it totally intrigued me. Bacon baked in the oven.


I put mine on a pizza pan.  Why?  Well because in the grand scheme of things it was already out waiting to be put away and I thought "why not!"  I lined it with parchment paper, then spread the bacon out.

Bacon getting ready to go in the oven

Popped it in the oven

Bacon in the Oven

waited patiently for it to finish.....almost there

Bacon cooked in oven almost done

And it's done.......

Oven cooked Bacon all done

Since I used parchment paper, clean up was a breeze.  It was just as crispy as if it had been fried.  We like crispy bacon in this house!  This will definitely be my go to method for doing my bacon for now on!


Follow Me on Pinterest

Tuesday, November 27, 2012

Pin 24 Re-Visited The Coffee Filter Wreath

I was never totally happy with the first coffee filter wreath that I did.  It wasn't just my trimming...Lol!  That was just BAD!  There was just something off about the whole thing.  Don't get me wrong, I liked it enough.  I mean, it's still hanging in my Dining Room above the hutch.  Granted we don't use that room much......ha!  I decided to try it again.  Why not,  I still had everything I needed.

Inspiration Pins


This time I went with White filters instead of Natural.  Not really because I liked the look any better more because when I bought supplies the first time around  I bought two packs of each, and white was what was left.  I also knew this time I needed to be more careful as I placed the filters so I wouldn't have trim.  I just knew if I had trim this one, I would probably ruin it too! 

Supplies Needed:

Coffee Filters  (2 packs)
Wreath Form (cardboard cut in any shape you want would work)
Hot Glue Gun/Glue Sticks
Any Embellishments you might want to add
*Hanger

*I didn't use anything to hang it with.  The form itself sat just fine on the nail in the wall.

I used a MDF flat wreath form that I picked up at Micheal's.  A piece of cardboard cut in a circle would work well also.  The Coffee Filters barely weigh anything at all.

Wreath Form for Coffee Filter White WreathWhite Coffee Filters

I decided instead of folding them in half, then half again like I did last time that I was just going to fold them in half once.  This way I could just use one across the whole wreath instead of trying to lay two next to each other just right.
Coffee Filter White Wreath, the beginning

The hardest part for me was keeping the same space between each filter.  If you have the ability to trim things evenly then this wouldn't be that big of deal.  I was just determined to not trim this wreath. I had my doubts that this one was going to be better......

Coffee Filter Wreath...a little more progress
 Just keep going around the whole circle.  It will feel like it is taking forever.   I caught up on a few episodes of Dexter and did a couple loads of laundry while making mine.   Once they are all glued on you can decide if you want to keep it plain or add any embellishments.   I decided to add some glitter (which I still need to even out) and a few embellishments.  

Finished White Coffee Filter Wreath..
Finished White Coffee Filter on wall
White Coffee Filter Wreath hanging in Bathroom

This is a bigger wreath then  the first one I did and I used less coffee filters for this one.  It went pretty quick and once I even out the glitter I will be happy with this one.  Best thing was that I didn't have to trim this one at all!  Woot!  Woot!

Follow Me on Pinterest

Monday, November 26, 2012

Pin 28 & 29 The Ornament Wreath and Pipe insulation as a Wreath Form

It seems no matter where I go I see Ornament Wreaths, whether it be online or in the store, they are everywhere.  I'm a huge fan of the wreath, but not so much of the price tag.  Pinterest is full of examples and how to's, so I thought I can do this.  After making a few I can see why they cost what they do.....they use a TON of ornaments.

 
Source: pinerly.com via Nicole on Pinterest
Source: google.com via Nicole on Pinterest

I didn't want to spend a lot of money on fancy ornaments.  I wanted to wait and see if I could even make one that I would want to hang up for all to see.  I hit up the Dollar Tree.  I bought 15 packs of ornaments for each wreath.  I actually had bought that many because I wanted to use some as fillers in vases, but turned out I needed them.  So my theory is after you think you have enough in your cart, add a couple more.  The first one I did I used a white Styrofoam form from Micheal's.  The second I tried using some pipe insulation as a wreath form from another pin


What You Need:

Ornaments (and lots of 'em)
Hot Glue Gun/Glue Sticks
String or Ribbon to Hang the Wreath
Wreath Form or Pipe Insulation
*Garland or Ribbon to wrap Wreath Form
*Duct Tape
Embellishments if wanted

*You only need the duct tape if you are using the pipe insulation, and wrapping your wreath form with garland or ribbon is optional. It helps hide any gaps between ornaments.

I took my insulation, realized that I needed it just a bit bigger, cut some off another piece and duct taped them together.  I didn't measure......I just eyeballed it and went with what I thought would look right. I didn't end up with a perfect circle (I think because of the added piece) but decided, the heck with it and moved on to the next step.

Pipe InsulationPipe Insulation as Wreath Form

Ignore the Halloween Tablecloth......It's my "crafting" tablecloth.  This way I don't have to try and be neat...lol!  Next you are going to take your garland/ribbon and wrap the wreath.  I was not precise about mine.  I bought my garland at the Dollar Tree.  I attached my string to hang it with at this point in the project also.
Garlandgarland wrapped around wreath form

Now you want to take your bigger bulbs and glue them along the inside and outside of the wreath form.
Ornaments around the outsideOrnaments around outside and inside

Take your smaller bulbs and basically just fill in the wreath.  Just go with whatever looks right to you.  I used 3 different sized bulbs.  I used the larger ones to line the inside and outside of the wreath form, the medium ones along the edge of the ornaments and the wreath, and the smaller ones to fill in the gaps.
Filling in the Gaps with Smaller Ornaments

Once you get all your gaps filled in you can add any embellishments that you want to add.  I added a silver glittery bow (also the Dollar Tree)
Finished Red,Green, Silver Ornament Wreath

 I think it took me longer to open all the containers of ornaments then it did to put the wreath together.  Well.......once I stopped over thinking placement.  I was trying to put them in a pattern at first, then just went with whatever I picked up next.  Here is another one that I made.
Red and Gold Ornament Wreath

I really want to take the bulb off that is on the side sticking out, but once these babies are glued down they don't want to come off!  I really want to make a few more of these because they are pretty fun, and quick.  I just don't have anywhere else to put them.  I will be keeping my eye out for after the holiday sales, so I can get some different ornaments.

  Follow Me on Pinterest